Send SMS with Teltonika – Usage
This chapter describes how the plugin is used in Ethiris to send SMS.
Create a script library to configure the connection to the router
It is recommended to create a separate script library to hold the configuration script, to ensure the script doesn't clash with or affect other script functions in the main script. It also makes troubleshooting and upgrading easier.
-
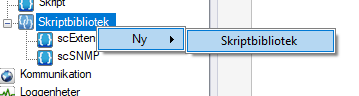
Create a new script library in Ethiris Admin by right-clicking Script Library -> New -> Script Library.
-
A new script library is created with the name New script library. Give the script library a suitable name by double-clicking the script library node and entering the new name. This example uses scSMS.
-
Paste in the following script:
// Disables certificate validation; can be removed once a valid certificate is imported
KentimaSmsClient.KentimaSmsClient.RestClient.SetIgnoreCertificateErrors(true);

// Sets the connection details for the router: url, username, and password.
KentimaSmsClient.KentimaSmsClient.SmsClient.Configure(_url_, _username_, _password_);

// Tests that the connection to the router actually works with the given credentials.
var testConnectionStatus = KentimaSmsClient.KentimaSmsClient.SmsClient.TestConnection();

if(!testConnectionStatus)
{
    // The connection failed - print the error message.
    Debug.Print(KentimaSmsClient.KentimaSmsClient.SmsClient.GetLastError());
}
else
{
    // The connection succeeded.
    Debug.Print("Connection to Teltonika Router works!");
}
Why is SetIgnoreCertificateErrors required?
By default, the Teltonika router's web-based API uses a self-signed certificate issued for a hostname based on the router's MAC address (e.g.
Teltonika001122334455) – not for the local IP address (e.g.192.168.1.1) that the plugin connects to. The certificate is therefore neither trusted by the server computer nor valid for the address being called, which means .NET's built-in certificate validation would otherwise reject the connection.SetIgnoreCertificateErrors(true)disables this validation so the connection is allowed anyway. The downside is that protection against man-in-the-middle attacks is lost, but since the connection is made to the router over a local network, the risk is normally considered acceptable.If you'd rather not disable validation entirely, you can instead create a certificate that is valid for the router's IP address – see Certificate valid for the router's IP address under Advanced.
-
Update
.Configure()and enter the correct information for the router. For example:Argument Value url https://192.168.1.1username smspassword the password set in the previous step Use https, not http
Always connect to the router via
https://instead ofhttp://, so that login credentials and communication cannot be read by outsiders on the network. Newer versions of RutOS also disable http by default and force https, so a connection via http may stop working entirely after a firmware update.Configure() is safe to run every cycle
Unlike
SendSms()/SendSmsWait()(see the warning further down), a repeatedConfigure()call with unchanged settings does nothing – the function is safe to call unconditionally in a script that runs cyclically. If the url, username, password, or modem id changes, the connection is rebuilt, and any messages still sitting in the old queue at that moment are abandoned. -
Click the Show Debug window button at the top of the script window to open the Output panel at the bottom of Ethiris Admin. Then save the configuration so the script runs. If everything went correctly,
Connection to Teltonika Router works!is shown in the Output panel.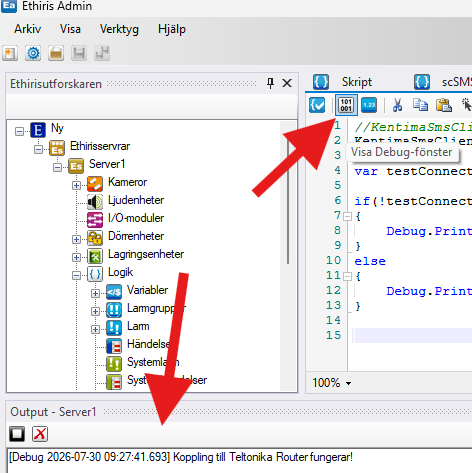
Choosing a modem with multiple SIM cards
Configure() comes in two variants: one that takes three arguments (url, username, password) and one that takes four (the same three, plus id). The example above uses the three-argument variant.
With three arguments, the plugin asks the router which modem to use for sending SMS:
- A router with one SIM card only has one modem to choose from. The router automatically responds with its ID, and the plugin uses it without any further configuration being needed.
- A router with two SIM cards (e.g. the RUTX series) has two possible modems, and the plugin cannot automatically determine which one to use. In that case,
GetLastError()prints an error message listing the names of the two modems.
In the latter case, Configure() needs to be called with four arguments instead, where the fourth is the ID of the modem to use for sending: Configure(_url_, _username_, _password_, _id_).
The modem id can also be found directly on the router, via SSH or the CLI window in the web interface, with the command ubus call mctl list.
Sending an SMS with the router
Once communication with the router works, SMS messages can be sent. There are two functions for this, SendSms() and SendSmsWait(), which differ in how they handle the sending:
| Function | Behavior |
|---|---|
SendSms() |
Asynchronous. The message is added to a queue and sent when the modem gets to it, without the script pausing to wait. The downside is that the function does not return a true/false indicating whether the send actually succeeded. |
SendSmsWait() |
Synchronous. The script waits until the send has completed, and the function returns true or false depending on whether it succeeded. |
Both functions take the same two arguments, both strings: the phone number and the text to be sent, e.g. SendSms(_phoneNumber_, _text_).
Phone number format
The phone number does not need to be given in international format – a regular local number also works. International format (e.g. +46701234567, with country code and +) is still recommended, to avoid ambiguity about which country the number belongs to.
Text longer than 160 characters is split into multiple SMS messages (standard GSM segmentation), which is worth keeping in mind since it can affect the cost per send depending on the operator's pricing.
If a queued send (SendSms()) fails, it is retried three more times, 15 seconds apart, before being discarded.
Don't put SendSms directly in the main script
By default, the Ethiris main script runs every 150 milliseconds. If a call to SendSms()/SendSmsWait() is placed directly in the main script, it will therefore run over and over again, resulting in a very large number of SMS being sent. The call must instead be tied to an event, e.g. onEvent() or onDataChange(), so that an SMS is only sent when that event actually occurs.
Why does this work in scSMS but not in the main script?
A script library such as scSMS only runs once – at Ethiris Server startup, or when the configuration is saved – unlike the main script, which is evaluated cyclically every 150 ms. That's why a SendSms() call can sit directly at the top level of a script library without sending SMS over and over again (see "Quickly testing the whole chain" below), but never in the main script.
Choose SendSmsWait() if the script needs to know whether the SMS was actually sent, and SendSms() if it's enough to queue the send without waiting for the result.
Quickly testing the whole chain
If you want, you can add the following script line directly in scSMS (the script library created earlier):
This sends an SMS every time the configuration is saved, which lets you quickly verify that the whole chain – connection, authentication, and sending – works from Ethiris.
Remove the line afterwards
Remove the line again once testing is complete. If it's left in scSMS, a new SMS will be sent every time the configuration is saved.
Usage example
A single alarm
Below, an SMS is sent when an alarm, MyAlarm, becomes active. An event listener is attached to the alarm's onStateChange, and an SMS is only sent when the alarm's new state (State) is 3 (active) – exactly the edge-triggered condition the warning above refers to, rather than checking the alarm's state on every cycle:
// Event listener on the alarm
MyAlarm.onStateChange = function(event)
{
    // The alarm has become active
    if (event.target.State == 3)
    {
        KentimaSmsClient.KentimaSmsClient.SmsClient.SendSms(_phoneNumber_, "Alarm: " + event.target.Name + " has become active!");
    }
}
All alarms in the project
The same pattern can instead be attached to the Alarms collection, to listen for all alarms in the project rather than a single alarm: